How (not) to make a website
For the last year or so, I've wanted to blog on various topics, but the lack of a, well, blog was always a stopper. Plus, as I'm preparing up for a second season of my programming course and thinking of various ways to expand my open-source work, a website where I can organize everything and keep it tidy was going to be very much useful. Hence, I decided I want to make myself a website.
More specifically, I wanted a website to:
- Host any articles I might write, potentially splitting them across multiple categories.
- Include some info about me and a CV in a neat, professional manner.
- Have an easily sharable address—though, technically, that's a function of the website's domain and not of the website itself.
- Be a central place linking all my internet identities, so I can send people there, instead of talking through the various social media channels we might use to communicate.
But, for some extra challenge, I also wanted to make that website be a showcase of my skills as a programmer. In essence, I wanted to:
- Write all HTML templates, CSS styles, and JavaScript snippets myself.
- Make my own system for structuring, building, and deploying the website, instead of using something made only for websites.
- Have the website be reasonably small to combat the rise of web bloat.
- Make the website be completely dynamic—or failing that, making it static. I ended up going static for now, but the idea of making the website change in response to every single request is still there on my mind. 😁
And... that's where the trouble began.
Now, if you are making your own website, I would strongly recommend going with something nice and opinionated for building your website, like Hugo or Eleventy, and don't do any of what I did. In fact, you should probably even use some of the premade themes for those tools and not roll your own—at least not initially. That way, you can focus on what's actually important: the content of your website—and skip a lot of the setup.
However, if your are convinced you want to write your own templates and use a generic build system for your website, please, read on. I disclaim any responsibility for any harebrained ideas this post might give you.
(Or click here to skip the boring technicalities and go straight to my takeaways)
Picking the tools
Writing the HTML for a whole website by hand is very fiddly, because parts of pages like navigation are going to repeat across all of the pages. In addition, writing articles as raw HTML tends to be distracting for me, and I much prefer writing them in something nicer, like Markdown. Hence, I, like many others, opted to write templates that the page's content is then written into, automatically, and to use a Markdown-to-HTML converter.
Pandoc
As soon as I started thinking about actually making this website, Pandoc came to mind. Pandoc is a command-line tool for converting between different markup formats—in my case, that would be converting from Markdown to HTML.
Now, there are many other markdown-to-HTML converters out there. Where Pandoc shines, however, is in its support for custom scripts that can modify any part of the document through—or even the output or input pipeline.
In addition to that, Pandoc is nearly universal, and can not only convert markdown to HTML, but also convert HTML back to Markdown, or convert between various other markup languages like LATEX, MediaWiki, RST, and more. Of course, your experience with a specific conversion might be different, but it's orders of magnitude simpler than converting things by hand.
I've used Pandoc in the past to convert my personal notes from Trilium's HTML export to TiddlyWiki's arcane wiki syntax1—and with that experience in mind, I was confident that it would be able to handle any markup conversion my website would ever need.
Tup
Just Pandoc by itself wouldn't quite cut it. Since my website would (hopefully!) have more than one page, I'd need some kind of system to tie everything together and rebuild parts of the website as they change. Trivially, for that I could use Hugo—which can be configured to use Pandoc—or another similar system which has everything already integrated for website usage. However, I wanted try using a "real" build system, figuring that if it can build C/C++ projects, should be able to build Pandoc projects too.
For that, I decided to use Tup. Tup is not as widely used as GNU Make, Ninja, or other popular alternatives; however, it captured my imagination long ago with the nifty way in which it tracks dependencies, and rebuilds only what's necessary. It uses various means to auto-detect any extra files the commands you configure might try reading and records those in a database. That database then allows Tup to have blazing-fast incremental updates where it fires off just the right commands and nothing else.
Hopeful that Tup would work out just fine and not need replacing, I went with it—and in the end, I'd say the choice paid off, because despite the odd way in which I set up deployment, there has been no case in which Tup failed to rebuild part of the project and deployed outdated code or in-progress drafts.
Optipng, jpegtran, lightningcss, ...
Having a build system, I decided that I wanted to optimize the files I host, so that users of my website would not have to spend as much bandwidth downloading them.
- Optipng is a optimizer for PNG images that makes sure all PNG images on my website are well-compressed and with no extraneous data in them. It shaves around 25% off each image.
- jpegtran is a similar optimizer for JPEG images, that only fixes compression without degrading quality. I'm a bit more careful with those, and make sure to encode them with a lower resolution and quality with an image editor before dropping them into the website; but it still shaves a good 5% off on top of that.
- Lightning CSS is a minifier for CSS. It also allows me to use modern CSS nesting without worrying about compatibility, so that's a nice plus.
- fontTools is a compressor and converter for fonts. As I'd rather not face the repercussions for directing all my website's users to Google's font CD, it takes care of automatically converting things to WOFF2.
Git
Another thing I wanted for my website was a version control system. Having one of those lets me worry less about keeping the "correct" files around and helps a bit with managing draft versions. Plus, if anything goes wrong while I'm working on the website, I know I always can go back to a known-good version.
Contrast that with a website that does not have version control—perhaps a WordPress or an installation of another popular content management system (CMS). In that case, you typically just have a draft system that gives you previews of one work-in-progress page as it would appear in the website. Yet, most CMS-s won't allow you to have multiple drafts that you then publish simultaneously ("branching off" a separate version of the website and then switching the whole website to the branch version at once), to browse old versions of your website at will and double-check differences between versions so you know you didn't randomly paste something mid-page, or to edit the styling, layout, and content all at the same time, without worrying that someone might open a broken website in-between.
A version control system gives you all of that—and more—as long as you can keep your content management system to only using normal text files without any databases2—hence the perennial popularity of flat-file content management systems among programmers3.
In my case, the version control system I picked was Git, as it has has proven itself over and over to be reliable and performant in a wide variety of cases. Plus I am quite familiar with it, and learning a whole new version control system feels daunting. That being said, I might yet switch to Pijul, especially once it matures a bit more.
Bash, awk, sed, ...
No list of tools would be complete without including the tools that tie them together and make them all play nicely with each other. In my case, those would be a few bash/sh scripts that wrap the necessary commands for running a development server or deploying everything, along with a few awk and sed scripts sprinkled around to mechanically transform files.
The strategy of having a series of shell scripts in the root of the project has been a recent favorite of mine, ever since I got around to using Bash to drive the end-to-end tests of a project I worked on, Apocryph. Even if it is about running a command or two, having them saved with the project instead of memorized by developers makes them much less of a burden when switching between projects.
Putting it all together
(Click to skip the step-by-step (and bonus content!) and go to the takeaways)
Mockup
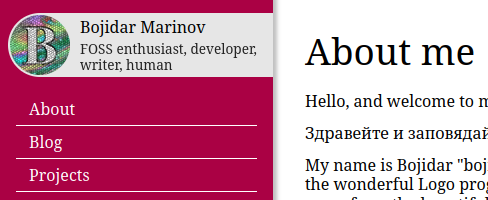
To actually make the website, I started off with hacking together a plain HTML and CSS mockup of my website, experimenting with a few things before finally settling on a sidebar with a profile picture and a short description at the top. Knowing I wanted the website to be as simple as possible, I had a really simplistic HTML structure, made entirely out of classless tags, which then got styled with CSS. For this stage of initial prototyping, I find I personally work better when I have everything in just one file, though for others it might be easier to make multiple files for HTML/CSS/JS.
I decided to use CSS grid to lay everything out, and I must say I am quite impressed with how easy it was to set up, compared to all other times I've used CSS before. —Though, to be fair, I don't actually need CSS grid to achieve the desired layout here. It gives me extra flexibility to change the layout if I want to, but for the simple sidebar I have, just a position: sticky or margin-right plus position: fixed would be enough.
In parallel with the mockup, I drafted up a simple "About Me" page in Markdown, and used Pandoc to convert it to HTML—and then copied that HTML directly into the mockup, so I can tweak the typography and heading sizes until it felt right.
My HTML ended up looking something like this: (click to expand)
<!DOCTYPE html>
<html>
<head>
<meta charset="utf-8"></meta>
<style>
/* (..CSS reset (via http://meyerweb.com/eric/tools/css/reset/) and typography..) */
body {
  display: grid; /* https://www.digitalocean.com/community/tutorials/css-css-grid-holy-grail-layout#grid-items */
  grid-template-areas:
    "nav"
    "content"
    "footer";
}
@media(min-width: 900px) {
  body {
    grid-template-areas:
      "nav content"
      "nav footer";
    grid-template-columns: auto 1fr;
    min-height: 100vh;
  }
  header>nav {
    height: 100vh;
  }
}
body>header {
  grid-area: nav;
}
body>article {
  grid-area: content;
}
body>footer {
  grid-area: footer;
}
header>nav {
  display: flex;
  flex-direction: column;
}
header>nav>a {
  display: block;
}
</style>
</head>
<body>
<header>
  <nav>
    <div class="profile"><!-- (..image and text for the profile picture..) --></div>
    <a href="#">About</a>
    <a href="#">Blog</a>
    <a href="#">Projects</a>
  </nav>
</header>
<article>
  <h1 id="about-me">About me</h1>
  <!-- (.. copy-pasted Pandoc output ..) -->
</article>
<footer>
  <!-- (.. license stuff ..) -->
</footer>
</body>
</html>
Templates
At that point, I had a finished mock out of one of my pages as a single HTML file. However, keeping things in just one file won't go well in the long run. I was already starting to get lost in the file just a few days after writing the HTML, and growing it from there would have only made it worse. So, that's when I moved to the next stage, and started introducing the pieces that would take Markdown files and automatically transform them into HTML.
To make the templates, I was initially considering some kind of command-line templating system, perhaps something like m4. However, when I got to this point, I discovered that Pandoc already has its own templating system built-in. Those templates are relatively simple, consisting only of $field$ (or ${field}$) interpolations/placeholders, along with $if(field)$ conditionals and $for(field)$ loops—however, even if they are not very powerful, I figured it would be pretty easy to switch them to another templating system down the road if I need to.
For this step of the process, I had one main goal: produce a command-line invocation which would take a Markdown file and generate the final HTML file. Using a simple template based on my HTML from before, I got to:
pandoc -f gfm pages/about.md -o public/about/index.html --template templates/article.html -V mdate=$(date -r pages/about.md -I)Here, I'm using -f gfm to instruct Pandoc to use GitHub Flavored Markdown, for the nicer tables and emojis. Then, the --template templates/article.html switch ensures it uses the right article template, which is basically the HTML from above, but with the styles extracted to a CSS file and with Pandoc's template format. Finally, I pass -V mdate=$(date -r ... -I) so that I would get the modified time of the .md file as a variable inside the template for the "Last updated" date on all pages of this website.
The way I use an (path)/index.html file as the output is not required, but it allows for nicer URLs with common web servers, as it would allow me to request /about/ and automatically get the index.html. (Note: As I ended up using Netlify later, this turned out to be unnecessary as they allow requesting path/file.html as either path/file or path/file/ out of the box.)
Build system
As I was making the templates, I was already scaffolding parts of the build system and project structure, just to make sure I'm not missing anything. There, I started out with writing a Tupfile (my first one! 😊) that would take the above Pandoc line and execute it for every .md file in the project.
However, this quickly ran into Tup's lack of ability to recursively glob directories. This means that while I could write rules like:
: foreach pages/*.md |> pandoc -f gfm %f -o %o --template=src/article.tmpl.html -V mdate=\$(date -I -r %1f) --wrap preserve |> dist/%B/index.html
: foreach pages/blog/*.md |> ... |> dist/%B/index.html
I could not write any of the following:
: foreach pages/*/*.md |> ... |> dist/%g/index.html
: foreach pages/**.md |> ... |> dist/%g/index.html
(Note: in the above, %f stands for the input filename, %o is the output filename, %B is the basename of the input file (e.g. about from pages/about.md), and %g is the glob (asterisk) match; see more in the Tup manual)
I initially tried working around this limitation by using of Tup's ability to call script files that generate extra rules or by using Tupdefault files to automatically descend into directories, but neither solution was particularly easy to implement, so I ended up scrapping that idea for now, and just hardcoded all the subfolders I had in the Tupfile.
Adding in Optipng, jpegtran, and the rest of the tools at that point, my Tupfile started looking like this: (click to expand)
!md = |> ^ pandoc %f %i > %o^ pandoc -f gfm %f -o %o --template=%1i -V mdate=\$(date -I -r %1f) --wrap preserve |>
!png = |> ^ optipng %f > %o^ optipng %f -out %o -quiet |>
!jpg = |> ^ jpegtran %f > %o^ jpegtran -optimize -progressive -copy icc -outfile %o %f |>
!css = |> ^ lightningcss %f > %o^ npx lightningcss --minify --bundle --targets '>= 0.25%%' %f -o %o |>
!ttf = |> ^ fonttools ttLib.woff2 compress %f > %o^ fonttools ttLib.woff2 compress %f -o %o |>

: foreach src/*.css |> !css |> dist/%B.css
: foreach src/*.png |> !png |> dist/%B.png
: foreach src/*.jpg |> !jpg |> dist/%B.jpg
: foreach src/*.ttf |> !ttf |> dist/%B.woff2
: src/favicon.png |> convert %f -resize 128x %o |> dist/favicon.ico

: foreach pages/*.png |> !png |> dist/%B.png
: foreach pages/*.jpg |> !jpg |> dist/%B.jpg
: foreach pages/*.md | src/article.tmpl.html |> !md |> dist/%B/index.html

: foreach pages/projects/*.png |> !png |> dist/projects/%B.png
: foreach pages/projects/*.jpg |> !jpg |> dist/projects/%B.jpg

: foreach pages/blog/*.png |> !png |> dist/blog/%B.png
: foreach pages/blog/*.jpg |> !jpg |> dist/blog/%B.jpg
: foreach pages/blog/*.md | src/article.tmpl.html |> !md |> dist/blog/%B/index.html
Fixing links and paths
To ensure that the markdown files I wrote were self-contained markdown files not tied to my website, I wanted to have all links inside them be relative links. However, the index.html trick I used earlier meant that the web browser saw an extra folder before the page itself, and would break all relative links. In a sense, if I had a Markdown file at pages/about.md which used ./about-me.jpg to refered to an image in pages/about-me.jpg, it would be find the image when previewed locally; but when built, it would generate a dist/about/index.html files to which ./about-me.jpg would mean dist/about/about-me.jpg and not dist/about-me.jpg (the HTML would instead need to use /about-me.jpg or ../about-me.jpg there).
Perhaps liberal use of HTML's <base> tag would have fixed the issue, but experimenting with it revealed it makes all #xxx links unusable, so I opted to go with a less invasive solution.
That's where Pandoc's ability to execute Lua filters really shined. By using the +rebase_relative_paths extension, I was able to get Pandoc to convert convert all paths to be relative to the project (e.g. turn ./about-me.jpg into pages/about-me.jpg), and then, with a simple Lua filter, I could turn that into the correct link (e.g. /about-me.jpg).
My Lua filter (click to expand)
-- Inspired by https://stackoverflow.com/a/48570927
function fix_path(path)
  if path:find('^%a+:') then
    return path
  end
  return path:gsub('/%./', '/'):gsub('//', '/'):gsub('^pages/', '/'):gsub('%.md$', '/')
end

function Link(element)
  element.target = fix_path(element.target)
  return element
end

function Image(element)
  element.src = fix_path(element.src)
  return element
end
I also took the opportunity to replace any final .md in links with a /, so that a ./contacts.md link in a Markdown file would become a link to /contacts/ in the resulting HTML.
All this changed the Pandoc invocation slightly, and I corrected the Tupfile from before to use the +rebase_relative_paths extension and the Lua filter.
Index pages
The next challenge on the line was generating index pages for things like the Blog page. Most static site generators, like the ones mentioned at the beginning of this post, already take care of that, so that would be another good reason to just use one of them.
In my case, I hoped I would be able to collect metadata from Pandoc as it processes the files in the directory, and then somehow concatenate it all into one big list. However, Pandoc does not have command-line flags for creating such an output (other than invoking it a second time, which I wanted to avoid), and I didn't want to deal with files in the Lua script itself, so I instead opted for an AWK script (AWK is a language for matching patterns and processing files, a bit similar to Sed, but more powerful).
Basically, given a bunch of Markdown files that look like:
---
title: The article's title
---
(..rest of the file that we would rather not process..)
I wanted a single YAML file that looks like this:
items:
- href: First article path
  title: First article title
- href: Second article path
  title: Second article title
# (...)
After some tinkering and browsing through AWK's documentation, the AWK script I wrote looked like so: (click to expand)
BEGIN {
  FS = ": "
  print "items:"
}
BEGINFILE {
  match(FILENAME, /^(pages\/)(.+?)(\.md)$/, href)
  print "- href: '" href[2] "'"
  ("date -Iseconds -u -r '" FILENAME "'") | getline mtime
  print "  mdate: '" mtime "'"
  frontmatter = 0
}
(frontmatter && $1 ~ /title|uuid|date/) {
  print "  " $1 ": '" $2 "'"
}
($0 == "---") {
  if(!frontmatter) {
    frontmatter = 1
  } else {
    nextfile
  }
}
To integrate that into the build system, I used an extra template that would list all items in a <ul> after the article's body text, and invoked it while passing the list of articles with Pandoc's --metadata-file argument:
: pages/blog/*.md ^pages/blog/index.md |> gawk -f src/gen-list.awk \$(ls -r %f) > %o |> dist/blog/index.yaml
: pages/blog/index.md | src/article-list.tmpl.html dist/blog/index.yaml |> !md --metadata-file=%2i -V mdate=\$(date -I -r %2i) |> dist/blog/index.html
Later, I went on to expand that script to also include short blurbs of articles, if such are present.
Helper scripts
As the project's complexity was gradually creeping up with me running a web server to test changes while developing, I decided it was about time to introduce a few helper scripts that would stay with the project, so I wouldn't have to rely on my memory to recall what the necessary commands were.
To that end, I made a short dev-server.sh script that launches a Tup monitor to rebuilds the project when anything changes, and runs a simple Python HTTP to allow previewing the site locally:
#!/bin/sh

tup monitor -b -a &

{ sleep 3; xdg-open http://localhost:8080; } &
python -m http.server 8080 -d ./dist

tup stop
(Note: for some reason, the tup stop at the end doesn't always manage to stop the Tup monitor process. No idea what's up with that, but it never caused any problems, so I ended up leaving it as-is.)
Compared to various live-reload web servers that I've used before, like Webpack's development server, this one definitely leaves some things to be desired, as it neither refreshes the browser automatically, nor waits for files to be available before giving a response to the user.
Picking a hostname
Having a pretty much fully decked out website ready (including some content, such as the Colemak article, that I wrote in-between fixing the build scripts), I decided it was about time to move on to the final steps to pushing it out to production, starting with selecting a domain name.
Given my email address, I really hoped I would be able to use bojidar.marinov.bg as a domain, but sadly, the current owner of marinov.bg never replied to my emails, so that was off the table. Hence, I brainstormed a list of domain names based off my main online username, bojidar-bg, along with a few fun ones like bojid.ar, and stuffed all of them into a spreadsheet. Then I shuffled the list and held a small double-elimination-like bracket tournament.
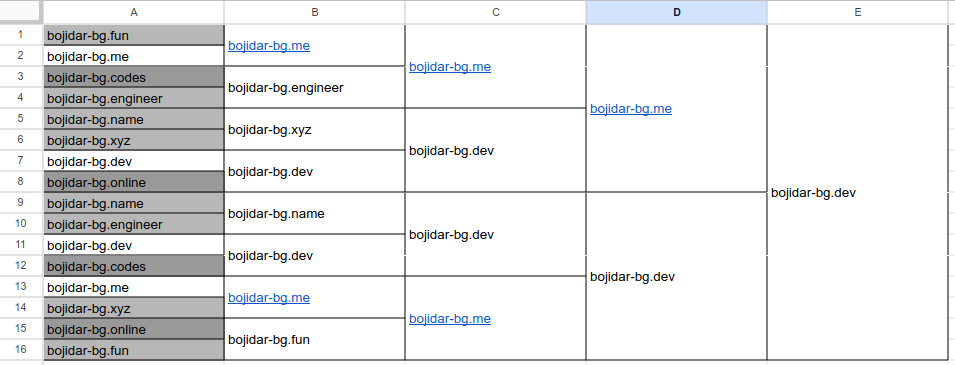
bojid.ar and bojidarbg.* in the first round.After ruminating on it for a bit, I ended up going with bojidar-bg.dev, as the clearest (and cheaper; *.me is pricey!) domain name to use. After shopping around, I found that Porkbun's prices were the most acceptable to me and went ahead and registered the domain for the next 7 years. So, here's to maintaining this website for at least that long! 🎉
Deployment
The final step to getting a website up is deploying it to a hosting provider. For that, I opted to use Netlify, in no small part thanks to their generous free plan. Netlify is a CDN which offers free hosting for static websites (like mine!), along with paid addons for things like form processing, server-side functions, or analytics. As I only needed the static hosting, I stuck with the free plan; but the rest do look useful for organizations that want a global-facing website without having to maintain their own infrastructure or cloud deployments.
Netlify's "typical" method of deploying websites involves setting up a Git repository and configuring a build system that they would execute. I already had both, however Netlify didn't have Tup support out of the box and my build system is really careful to rebuild just what's changed. Hence, I ignored all that, and just used the netlify CLI to upload my dist/ folder to Netlify's servers, and configured them to serve it as bojidar-bg.dev.
Of course, I wouldn't want to deploy uncommitted changes from my current working folder to production; that would be most unfortunate. To ensure I only deploy the version committed in Git, I used git stash --include-untracked plus a bash script adopted from a Stack Overflow answer that would adjust modification times to their respective commit times.
`deploy-prod.sh`
STASH_RESULT=`git stash push -m cleanbuild --include-untracked` # https://stackoverflow.com/a/38887400
echo "$STASH_RESULT"

rev=HEAD # https://stackoverflow.com/a/36243002
for f in $(git ls-tree -r -t --full-name --name-only "$rev") ; do
  TARGET=$(git log --pretty=format:%cI -1 "$rev" -- "$f")
  CURRENT=$(date -Is -r "$f")
  [ "$CURRENT" != "$TARGET" ] && touch -d "$TARGET" "$f"
done

tup

netlify deploy

if echo "$STASH_RESULT" | grep cleanbuild >/dev/null; then
  git stash pop --index
fi
And voila! There you have it: a website coded by hand using Pandoc and Tup and then deployed to Netlify with a few simple bash scripts!
Something I wasn't super sure about was invoking tup inbetween git stash and git stash pop. If something were to happen whereby tup failed to update a file before returning to the bash script, Netlify's CLI would end up uploading the stale version—and that would be bad!
However, it turns out, Tup works even better than I hoped for! 🎉 Even if I leave the Tup monitor from dev-server.sh running, Tup manages to correctly pick up the fact that there have been changes and update all the changed files—and wait for those updates before continuing to deploying the new version. Granted, it sometimes rebuilds the website twice, as it picks the changes up after stashing changes but before modification times are updated, but even when it does that, it preserves correctness.
Redirects
After deploying, I still had a few kicks to work out with the website. One of them was getting redirects working for the few pages that needed them (such as the main page, /). For that, I used Netlify's _redirects file format, along with a simple Tup rule that gathers redirects from all files that define them:
: pages/*.redirects pages/blog/*.redirects src/*.redirects ^pages/404.redirects | pages/404.redirects |> cat %f %i > %o |> dist/_redirectsNot defining all redirects in one file allows me to create redirect files with descriptive names right where they would logically "exist" in the structure of web pages. Whether that is useful going forward or not remains to be seen, but I do enjoy the idea so far.
Atom feed
Way back, I had read a few article by Bryan Braun and others (sadly, lost the links) about the wonders of RSS/Atom feeds and how they should be embraced and used more widely. So, having made my own website, I wanted to also add feed support to it.
For that, I slightly modified the index.yaml listing of all posts from earlier to include any lines prior to a <!-- SNIP --> comment as an article blurb. Then, I used a different Pandoc template to generate the Atom feed itself.
The template looked roughly like this: (click to expand)
<?xml version="1.0" encoding="utf-8"?>
<?xml-stylesheet type="text/xml" href="/atom.xsl"?>
<feed xmlns="http://www.w3.org/2005/Atom">

  <title>$sitetitle$ — $title$</title>
  <link href="https://bojidar-bg.dev/blog.xml" rel="self"></link>
  <link href="https://bojidar-bg.dev/blog/" rel="alternate"></link>
  <updated>$mdate</updated>
  <id>urn:uuid:$uuid$</id>
  <icon>$host$/favicon.png</icon>

  $for(items)$
  <entry>
    <title>$items.title$</title>
    <author><name>$items.author$</name></author>
    <link href="$host$$items.href$"/>
    <id>urn:uuid:$items.uuid$</id>
    <updated>$items.mdate$</updated>
    <published>$items.date$T14:00:00Z</published>
    <summary type="xhtml">
      <div xmlns="http://www.w3.org/1999/xhtml">
        $items.blurb$
        <p><a href="$host$$items.href$">Read the rest of the article...</a></p>
      </div>
    </summary>
  </entry>
  $endfor$
</feed>
(Note that I used XHTML here instead of CDATA-embedded HTML5, for "correctness"'s sake. Just make sure to also use Pandoc's XHTML output.)
Then, to make it nice and pretty, I decided to use XSLT to make the feed look like the rest of my website, after seeing that trick used on a friend's website.
My XSL stylesheet ended up looking roughly like this: (click to expand)
<?xml version="1.0" encoding="utf-8"?>
<xsl:stylesheet version="3.0" xmlns:xsl="http://www.w3.org/1999/XSL/Transform" xmlns:atom="http://www.w3.org/2005/Atom">
  <xsl:output method="html" version="1.0" encoding="UTF-8" indent="yes"/>
  <xsl:template match="/">
    <html xmlns="http://www.w3.org/1999/xhtml">
      <head>
      <title><xsl:value-of select="/atom:feed/atom:title"/> RSS Feed</title>
      <link rel="stylesheet" href="/site.css" />
      <!-- (.. rest of the usual <head> ..) -->
      </head>
      <body class="atom">
      <header>
        <nav>
          <!-- (.. rest of the usual navigation ..) -->
          <p><strong>Subscribe</strong> by copying the following URL into your Atom feed reader of choice:<br/><code style="user-select: all; white-space: nowrap;"><xsl:value-of select="/atom:feed/atom:link[@rel='self']/@href"/></code></p>
          <p>Don't have an Atom reader? Just use an email feed service like <a><xsl:attribute name="href">https://feedrabbit.com/?url=<xsl:value-of select="/atom:feed/atom:link[@rel='self']/@href"/></xsl:attribute>FeedRabbit</a>!</p>
          </div>
          <a><xsl:attribute name="href"><xsl:value-of select="/atom:feed/atom:link[@rel='alternate']/@href"/></xsl:attribute>Back to the main website</a>
        </nav>
      </header>
      <main id="content">
      <xsl:for-each select="/atom:feed/atom:entry">
      <article>
        <header>
          <span>By: <xsl:value-of select="atom:author/atom:name"/></span>
          <span>Published: <time><xsl:value-of select="substring-before(atom:published, 'T')"/></time></span>
          <span>Last updated: <time><xsl:value-of select="substring-before(atom:updated, 'T')"/></time></span>
        </header>
        <xsl:copy-of select="atom:summary" /><xsl:copy-of select="atom:content" />
      </article>
      </xsl:for-each>
      </main>
      </body>
    </html>
  </xsl:template>
</xsl:stylesheet>
Observe that other than a key differences like the <xsl:template> wrapper and the <xsl:for-each> loop, the XSL file is pretty much equivalent to my main website's template. And the final result is similar as well: you get the exact same website design while browsing my Atom feed as on any other page, at least on major browsers like Firefox and Chromium.
I am curious whether XSL might have been a suitable format to use for all my templating needs on this website. Sure, XML is a bit hairy to write and maintain, and XSL would require converting all my articles to XML before I can use it on them; but, given that all my pages are some form of XML (HTML) anyway, it might just be the tool for the job. Perhaps... perhaps in another word, where XML was the basis we use for all data storage and transfer, instead of SQL and plain-text, it would have worked... 🤔
OpenGraph support
As soon as I tried sending links to my website to friends, I noticed a glaring oversight: I had forgotten to add OpenGraph metadata, so the various chat applications were either refusing to show previews of it or were showing my profile picture as the only preview, due to it being the first <img> tag on the page.
To fix that, I had to add a few extra meta tags to the header of my website: (click to expand)
<meta property="og:title" content="$title$" />
<meta property="og:site_name" content="$sitetitle$" />
<meta property="og:url" content="$host$$path$" />
$elseif(firstimage)$<meta property="og:image" content="$host$$firstimage$" />
<meta property="og:type" content="article" />
<meta property="article:published_time" content="$date$" />
<meta property="article:modified_time" content="$mdate$" />
<meta property="article:author" content="$host$/contact" /> <!--HACK--!>
Unfortunately, the OpenGraph article:author property, as far as I can see, must link to a page that has an og:type of og:profile that has separate profile:firstname and profile:lastname properties, but all my articles only have a textual author field that has both names concatenated. I ended up linking all pages to my contact page and adding the required properties to it, which is a bit hacky and might need change if I ever have guest-posts.
I also made good use of Pandoc's Lua filters again, and added code which would detect the first image in the page's contents and put a link to it in the firstimage variable: (click to expand)
function Pandoc(doc)
  doc.blocks:walk({
    Image = function(element)
      if doc.meta.firstimage == nil then
        doc.meta.firstimage = element.src
      end
    end
  })
  return doc
end
Bonus! Printing PDFs from Firefox on the command line
My resume is a PDF generated by printing out a handwritten HTML page a markdown page with a custom template and styling using Firefox, so when I added it to the website, I decided it would be fun to launch Firefox and print out the PDF from Tup itself.
Thing is, despite it being 2024, Firefox still does not have a command-line switch for headlessly printing to a PDF! And, worse, the Stack Overflow question on the matter didn't have anything looking like a solution posted.
But upon further research, it turns out printing to PDF is something that Firefox can do automatically through WebDriver/Selenium, a protocol for automating browser interactions. So, some fiddling through documentation and experimenting with scripts that inexplicably did not work, I got the following Node.js script that would print an A4 page:
(click to expand)
const {Builder} = require('selenium-webdriver');
const firefox = require('selenium-webdriver/firefox');
const {writeFileSync} = require('fs');
const {resolve} = require('path');

let driver = await new Builder().forBrowser('firefox').setFirefoxOptions((new firefox.Options()).addArguments('--headless')).build();

try {
  await driver.get('file://' + resolve(process.argv[2]));

  writeFileSync(process.argv[3], Buffer.from(await driver.printPage({background: true, width: 21.0, height: 29.7}), 'base64'));
  // width: 8.5*2.54, height: 11*2.54  for US letter paper
} finally {
  await driver.close();
}
Granted, it takes around 4 seconds to update the PDF, but that's still better than having to manually print it out from Firefox every single time I change something in my CV.
In comparison to the above script, the Tupfile change was much simpler:
!copy = |> cp %f %o |>
!html2pdf = |> node src/pdf-driver.js %f %o |>
: foreach pages/*.html |> !copy |> dist/%B/index.html
: foreach pages/cv.html |> !html2pdf |> dist/cv/cv.pdf
EDIT: with the transition to using markdown for the CV, it now looks like this (in particular, we have to be careful to tell Tup about any extra dependencies it needs to generate before running the PDF driver from before):
: foreach pages/cv/index.md | src/cv.tmpl.html |> !md |> dist/cv/index.html
: dist/cv/index.html | dist/favicon.png dist/cv.css |> !html2pdf |> dist/cv/%B.pdf
Takeaways
An overall takeaway from my experience making my own websites is that making websites from scratch takes.. a lot of work! Luckily for most of you, there are a lot of good frameworks out there, including the aforementioned and widely-popular Hugo, which will take care of most of the easy setup work so you don't have to bother with it. Unluckily for some of you, you might get inspired by this post to make your own website completely from scratch and use your favorite build system to do so—in which case, I am sorry.
But, moving past that, I'm amazed at how easy it was to actually make a small static website. Sure, I needed to jump through a few hoops here and there (OpenGraph, dramatic sigh), but all I needed was a domain and some willingness to learn a few tools to set the content up.
(In fact, most hosting providers, Netlify included, would provide you with a subdomain for free. So, you don't even need a domain to have a "website"—just need the content!)
Also, I do mean to say "small" static website. This page, which is by far the longest page in my blog, takes about 560 kB (187 kB with fonts installed!)—uncompressed and uncached—to load fully; and most of that is just fonts that can be safely skipped. Meanwhile, my FOSDEM 2024 writeup, despite having six images, takes just around 930 kB (663 kB with fonts installed!)—again, uncompressed and uncached—to load the whole page—all thanks to carefully lowering the resolution and quality of any images before I add them to the blog.
Of course, I can still make it smaller: perhaps stripping fonts wouldn't hurt; plus I have a sense that my CSS is larger that it should be. But, to put that in perspective, a typical image taken with a phone weighs in around 2 MB. Or, worse, Zoom currently takes about 6 MB—in JavaScript, not content—just to show a landing page4—so.. I would say, removing bloat has gone a good way already.
Update: I managed to reduce font downloads whenever the user has the needed fonts installed locally! 🎉 (With a few odd CSS tricks, because Firefox did not like my local("Raleway") font face when using variable fonts.) Now, if fonts are not installed, download sizes should be identical, but otherwise, I get about 320 kB saved per page if fonts are available!
Update 2: My projects page is now the largest page, weighting in at 1.7 MiB without fonts, for 19 images.
Looking back at the tools I picked, I would definitely use them again if I had to start over!
- Pandoc with Lua scripts might be a bit slow (currently, ~1.3s to rebuild any single page, though Tup parallelizes that), but the customizablility it offers through scripts and format extensions is a lifesaver compared to having to use complicated pre- or post-processing steps to achieve the same results.
- Pandoc's template system seems to work well enough for a website—apart from a few cases that required extra Lua scripting to work around. Still, moving forward, I believe I might want to change the templates to use a simple bash script instead, similar to what Bradley Taunt's barf does—as that would be infinitely more flexible.
- Tup might be less established than alternative build systems and does not like working with trees of directories, but it is quite fast and also extremely resilient. I've yet to see it mess up any builds—it's that good.
- Git is rightfully the version control system of choice for most programmers given how well it works. The trick with modification times I used would be the only thing I can complain about, as it would have been nice to have modification times stored in the version control system too.
- Shell scripts in the root of a project keep being one of the simplest ways to set up build and deployment pipelines once and forget about it. It's only rivaled in simplicity by likes of NPM scripts, in case you are using the respective languages already, but
sh/bashis much more universal.
As for things I learned, I can say that I got to learn the following through making a website:
- The inter-workings of registrars and DNS servers—setting up DNS for a website would do that to you.
- How to use AWK in a wider variety of circumstances, as I usually just reach for Sed instead.
- Tup! I finally got to try it out and am slowly looking for other things I can use it for.
- OpenGraph and Atom feeds, and how to set those up. Also, a bit more about Selenium/WebDriver.
- A, hopefully healthy, appreciation for XML namespaces and the power of XSLT transformations.
But mainly, if there is something to be said, it's that the technical part of making a website is an art, but it won't matter if you don't also have some content to fill it out—so, as usual, it's best to focus on figuring out the content, as the rest is easy and readily reusable once you get to it.
Future work
In the future, I'm thinking of transforming my site into being much more dynamic and making it change in response to every single visit made to it (or at least, to every single visit without the Do-Not-Track header set). For example, all links in sidebars and listings might get larger in response to how many visits they've had; or perhaps the sidebar color might gently shift in hue for every new request; etc.. Doing so would require me to abandon the current static site hosting, but I do think it would be a fun challenge to work through some day. 😁
But other than that—I now have a website! I'm slowly filling it out with articles and pages (so far, long-form articles of 3000+ words, but articles nonetheless) to cool off that itch for sharing random things with others. Hopefully, in the next 7 years, it would be a place for others to find ideas, points we might have in common, or just spend a few moments of their busy life reading. But if nobody else comes, at least it's mine—my website, my place to exist on the interwebs.
So, if you have been following my website so far—thanks a ton! Meanwhile, if you are just randomly stumbling on this page—I hope it proved inspiring or informing in some way!
You can see how I did that conversion in the following gist.↩︎
Note: there are version control systems that can work with databases, like in this blog post by Garrit, or databases that have version control integrated, such as Dolt. I have not tried either, as flat text files are surprisingly fast already, but if you must use a database, you can still make use of version control if you need it.↩︎
See also Chris Wellon's Why Do Developers Prefer Certain Kinds of Tools? blog post.↩︎
See Niki's article about JS bloat for more examples.↩︎
Browse more articles?
|← Articles tagged website (1/7) Website refresh - now with more Lua →
← Reflections on two years of using Colemak Articles tagged technology (2/17) Transferring photos over ADB →
← My FOSDEM 2024 Experience Articles on this blog (3/54) Understanding APA with railroad diagrams →