Using DM-Cache to speed up an HDD with an SSD
After being gone for a few month, I came to the painful realization that my desktop machine felt way slower than a laptop, simply by virtue of having half its files on a spinning hard drive.
This article documents the process I used to move an existing installation of Arch Linux from being partitioned between an SSD and HDD to being entirely on the HDD and using the SSD as a cache, through Device Mapper. The journey involved watching bytes be shunt around, making high-stakes changes to whole disks, feeling like a wizard while tweaking the boot process, and getting away scot-free in this daring race against entropy and aging hardware.. for now. So join me, to see how a piece of hardware that took 10 minutes to start before, can now boot a fully-functioning system up in seconds—and all of that, without any ongoing maintenance—it just works.
Problem statement
I have a desktop machine which has:
- A decent CPU and plenty of RAM.
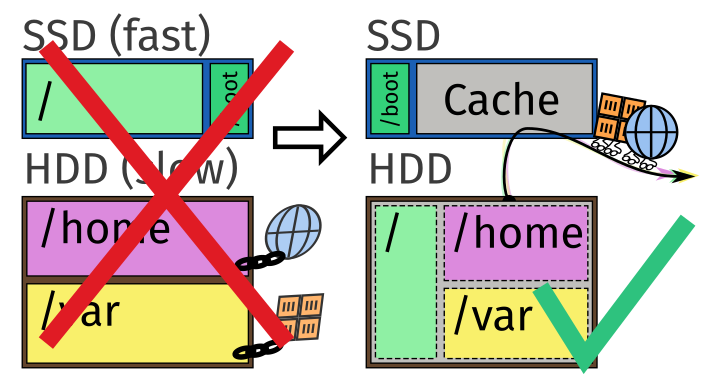
- A small 256GB SSD holding
/boot(files needed for initial UEFI and OS setup), and/(system files, aka the root partition). - A large 1TB HDD of spinning rusty doom, holding swap,
/home(user files) and/var(data). - An Arch Linux installation, apparently partitioned by hand to maximize pain.
When I was installing Arch Linux 3 years ago, I thought that since the SSD seemed small, I could reserve it for system files and keep all of my own files and random development work to the HDD. Supposedly, the files in /home and /var would either be used sparingly, being random documents, or would be small enough to fit in RAM cache, being some local database's files.
Performance was good in the beginning, but over time, the machine was starting slower and slower, and opening files in the first few minutes after starting was painful.
After investigating (with top and iotop), it turned out that there were a few applications that loved to read/write from /home and /var.
In particular, the two main offenders were:
- Firefox. Goes over and compacts all websites' data after a crash, often taking over 8 minutes to fsync files in
/home, as noted in bug 1778472. - Docker. Stores all containers' files in
/var... and as a result, containers took forever to start, especially after a reboot, as the Linux's built-in RAM cache is still empty.
As the Firefox profile grew over time and as I started working on more and more Docker-based projects, I thought I would just buy an extra SSD and move everything there. However, as the motherboard is old enough to lack NVMe support, it didn't feel right to buy a non-NVMe SSD that I will throw away when rebuilding the whole machine some day.
Instead, I remembered having read something about using the SSD as a cache for the HDD.
And, with that query, I dove in.
Research
Turns out, there are a lot of people who have already done something similar, using their SSDs as a cache for their harddrives. Take for example this SuperUser question on using a small SSDs to cache an HDD which looks at solutions for different operating systems, or this article by Nikolaus Rath on SSD caching in Linux that explores a few of the main ways to set such caching under Linux. Most of the articles I found date from ~2015, apparently it wasn't as interesting of a topic once SSDs dropped to around $200/TB.
Under Linux, there's three main options:
lvmcache, as described by e.g. RedHat Documentation's on lvm_cache. This one I would recommend to anyone setting up SSD caching on a new Linux installation, no matter the distribution. Sadly, it wouldn't work for existing Linux installations that lack LVM, like mine... unless one does something hacky similar to what's described in this ServerFault question on converting a Linux install to LVM.bcache, as described by in the bcache wiki. Unfortunately, it's in a bit of an odd place today, withbcachefsbeing its appointed replacement, and thebcachemaintainer being on somewhat bad terms with the Linux maintainers. To avoid the potential pain of using an unmaintained part of the kernel, I decided to forgo setting this up; though it seems to be a popular choice among users.dm-cache, the underlying mechanism used by LVM to set caches up, as described in the Linux documentation. It doesn't have great support in Arch Linux (not even a wiki page!), and it requires a bunch of commends to set up, yet... using it directly means I don't even need to set LVM up, I just need the right command to run in the right moment!
At that point, I picked dm-cache, and starting researching further about it.
My plan was to move all files to the HDD, including the system files. However, something that hadn't crossed my mind earlier was that the root (/) partition holding tho system files is special. You see, we need a few programs to configure disk caching, yet we cannot load them from the root partition, if we haven't configured it yet. It's very much a chicken and egg problem: we need the partition to be configured and mounted before we can even start configuring it!
The solution for this in Linux land is rather ingenious: all the necessary programs for configuring the root partition are stored in an initial, RAM-based file system (initramfs or Arch, initrd on Debian/Ubuntu/RedHat) that is loaded with the Kernel from /boot. (And /boot itself is loaded by the UEFI bootloader, which is why we keep it as a separate partition.) That way, we can do anything we need to set that root partition up; though it makes configuring encryption or exotic filesystems for the root partition is more challenging for other partitions.
For a root partition with dm-cache specifically, I found a few guides that proved very useful in helping me navigate what was to come:
- devfaz's
arch-dm-cache-rootfsrepository, from 2014, that was made forlvmcache, but still pointed me in the right way for setting the initial filesystem up. - Forza's dm-cache blog page from 2023, which detailed all the steps one would use to set
dm-cache. - Forza's dm-cache wiki page, from later 2023, which came with a some practical suggestions once I had the running system.
- Kyle Manna's dm-cache tutorial, from 2013, and updated in 2014 with a recommendation for
lvmcache, which helped me figure out the specific partitions I would need for caching.
And so, nerd-sniped by the possibility of actually making it with dm-cache, I set out.
(Time spent researching: 2+ hours)
Caveats
If you are going to follow the steps described in this article, please note that:
⚠️ Resizing partitions and moving files en masse is always inherently risky. Don't play with files and disks you don't have a backup of and can't afford to lose.
⚠️ Once
dm-cachehas been configured inwritebackmode, the filesystem on the original partition should NOT be accessed directly.(If the bold wasn't spooky enough: it's UNDEFINED BEHAVIOR! to mount the raw, uncached device. Scared now? 😇 Good!)
In particular, the cached and original partition will have the same UUID—so use
/dev/mapper/...paths instead of/dev/disk/by-uuid/...paths.(Alternatively, there's is also a way to hide the original partition with
udev, see Forza's wiki page for details; this is especially useful for BTRFS)⚠️ There are no guarantees that this won't break your system. Always have a bootable USB stick to be able to start the system without the root partition.
⚠️ Your millage may vary: read documentation before trying at home; non-Ext4 partitions may require extra steps; this has not been tested with full-disk encryption.
Otherwise, if you are just reading along for the fun, please enjoy what is to come.
Implementation
Step 1: moving everything to the HDD
The first step involved getting everything moved into one big partition on the harddrive. The HDD is slow, but with caching, it should be quite fast once we are done with it.
For me, this involved merging the all the partitions (/home and /var) already on the HDD, then transferring the files from the SSD over.
Luckily, after removing pacman's package cache and some outdated dotfiles, files on my latter partition, /var, were small enough to fit into the earlier partition, /home, and have enough space left over for /. That way, I could just copy and move files, while leaving the original /var and / partitions untouched.
So, I downloaded and booted an Arch Linux installation medium, then mounted the two HDD partitions.
After that, I moved all files on the /home partition into an extra folder called home, since it was going to become the / partition.
Then, I used used cp -a to copy files from the /var partition over while keeping their permissions (and used Ctrl-Z + ls + fg to check progress like a caveman 😂).
Once that was finished, I copied all of the root / partition files into the merged partition as well.
Then, I simply followed the usual installation process to arch-chroot into the merged and now root partition. There, I manually fixed the /etc/fstab file explaining where all partitions are, just removing all the extra ones and changing /home into /, and regenerated the grub config with a good old grub-mkconfig -o /boot/grub/grub.cfg (thus telling the kernel (through the command line) about the correct root partition).
At that point, I had the full system (except /boot) on the harddrive, configured to not use the SSD at all.
I booted into it, and was greeted by my usual Arch Linux install, as if nothing had happened. Even Docker worked.
Meanwhile, lsblk reported the following:
NAME            MAJ:MIN RM   SIZE RO TYPE MOUNTPOINTS
sda               8:0    0 931.5G  0 disk
├─sda1            8:1    0    32G  0 part [SWAP]
├─sda2            8:2    0 499.5G  0 part /            # This used to be /home
└─sda2            8:2    0 300.5G  0 part              # This used to be /var
sdb               8:16   0 232.9G  0 disk
├─sdb1            8:17   0   512M  0 part /boot
└─sdb2            8:18   0 232.4G  0 part              # This used to be /
Success! 🎉
To finish up the move, I deleted the old /var partition, did a live resize of the root partition to stretch the whole HDD (similar to how this Ask Ubuntu question did live resizes of partitions), and continued on to the next step.
(Time spent moving files: ~2 hours, primarily waiting for /var to finish copying)
Step 2: preparing the SSD for dm-cache (and doing a bit of math)
Next up, we need to get our parameters for the cache, and set up the necessary partitioning on the SSD before we can actually use it.
For its operations, dm-cache requires three partitions/devices, as explained in the Linux kernel documentation:
- a metadata device, holding information about which parts of the disk are cached (and will itself get cached in RAM while in use)
- a cache device, holding the cached data (and the partition itself might be sharable between multiple caches)
- an origin device, holding the original, hard data that we want to speed up access to.
Once in operation, the data stored on the origin device is cached in "cache blocks", the size of which is configurable as a number of 512-byte sectors each block is made out of... and that number has to be divisible by 64, so it's really cache blocks made out of some multiple of 32 kibibytes. The optimal size is probably related to the SSD's block size or SSD's erase size... and we probably want to consider the effects of SSD write-leveling too.
But.. figuring all out is quite a rabbithole and math, so I just went with a block size of 256 as in Forza's blog post. (Though.. official recommendation is block size between 512 and 1024 instead.)
The exact size of the metadata partition depends on the amount of blocks cached... and while there are some formulas floating around the web for it, there is also a userspace program called cache_metadata_size, which can compute the needed metadata size, and should be what you use instead of math.
In my case, I had ~232.3 GiB space left on the SSD for caching; plugging that directly into cache_metadata_size would suggest ~55 MiB, but apparently I messed up the formula I used and allocated it a whole 953 MiB. (See, you should use the utility instead of math!)
So, I opened up the SSD in Gnome Disks, deleted the old root partition, and split it into a small metadata partition and a cache partition taking the rest of the space.
I also zeroed out the metadata partition, as per Kyle's tutorial's recommendation.
(Time spent repartitioning: ~20 minutes)
Step 3: (optional) setting up a dummy dm-cache device
The next step for me was configuring dm-cache in passthrough mode.
Passthrough mode makes the cache directly forward reads and writes to the origin device, effectively disabling the cache, so that even if we mess the configuration up, it won't break the filesystem on the harddrive itself (avoiding the undefined behavior caveat for now).
In doing that, I wasted some time experimenting with it on the installation medium before making the configuration for real, just to confirm that all the pieces are in place before moving on. However, you could save yourself some time and skip to the next part directly.
Finally, it was time to create my first Device Mapper device.
Following Forza's blog again, I used the following commandline to create a virtual device backed by dm-cache:
METADATA=/dev/disk/by-partuuid/REPLACE_-WITH-YOUR-OWN_-DEVICEUUIDS_
CACHE=/dev/disk/by-partuuid/REPLACE_-WITH-YOUR-OWN_-DEVICEUUIDS_
ORIGIN=/dev/disk/by-partuuid/REPLACE_-WITH-YOUR-OWN_-DEVICEUUIDS_
dmsetup create root-cached --table "0 $(blockdev --getsz $ORIGIN) cache $METADATA $CACHE $ORIGIN 256 1 passthrough default 0"
Here, root-cached is the name of the newly-created device, while the long string after --table is the configuration for that device, and it has the following structure (as documented here):
0$(blockdev --getsz $ORIGIN): start sector and number of sectors of the created device. (Can be used when concatenating multiple devices; in our case, we just tell it that we will be configuring everything from 0 to the total size of the origin device)cache: the kind of device mapper configuration we want for those sectors, in this case a cache.$METADATA: the metadata device.$CACHE: the cache device.$ORIGIN: the origin device.256: the cache block size. (Again, official recommendation is to use a number between 512 and 1024 here.)1: the number of feature flags used.passthrough: a feature flag meaning that the cache should use passthrough mode (basically disabling it)
default: the policy used (as described here); one ofsmq,mq,cleaner, ordefault(currently an alias forsmq). The policy determines which blocks to keep in the cache.0: the count of policy arguments (which we don't use here).
Naturally, my first few tries resulted in errors, as I had to double-check the arguments I pass to dmsetup and boot into the installation media again, as the Kernel would (sensibly) refuse to map a device that's currently mounted.
But in the end, I got a dm-cache device, so I went on to the next step: setting it up in initramfs/initrd.
(Time spent experimenting: ~40 minutes)
Step 4: getting a dummy dm-cache configuration in initramfs
...as you might have guessed, getting dmsetup to work once is the easy part. The harder part is getting it to work at boot time.
For that, we need to get dmsetup along with our command that uses and any needed kernel modules into initramfs/initrd, so that when the Linux kernel boots up, we can configure the root partition in time.
Fortunately, Arch Linux makes this rather straightforward through the use of its mkinitcpio system, which lets us configure the initial, pre-root filesystem through "hooks" and "install" scripts. Hooks are scripts that run when the system is booting up, while install scripts configure what goes into the init filesystem.
EDIT 2025-11-13: Updated the scripts to keep up with Arch Linux changes like the removal of /usr/lib/initcpio/udev/11-dm-initramfs.rules and /bin/bash from the mkinitcpio image.
In our case, we want a hook script which runs the command for setting up dm-cache:
/etc/initcpio/hooks/dm-cache
#!/usr/bin/ash

run_hook() {
    modprobe -a -q dm-mod dm-cache dm-cache-smq >/dev/null 2>&1
    msg ":: Activating dm-cache device..."

    METADATA=/dev/disk/by-partuuid/REPLACE_-WITH-YOUR-OWN_-DEVICEUUIDS_
    CACHE=/dev/disk/by-partuuid/REPLACE_-WITH-YOUR-OWN_-DEVICEUUIDS_
    ORIGIN=/dev/disk/by-partuuid/REPLACE_-WITH-YOUR-OWN_-DEVICEUUIDS_
    ORIGIN_SIZE=$(blockdev --getsz $ORIGIN)
    OPTS="256 1 passthrough default 0"

    # TODO: Run cache_check here! Otherwise, if a power outage corrupts the cache metadata, all guarantees are off!
    dmsetup create root-cached --table "0 $ORIGIN_SIZE cache $METADATA $CACHE $ORIGIN $OPTS"
}
# vim: set ft=sh ts=4 sw=4 et:
And, to make it run, we need an install script which adds all the necessary dependencies for that script: (which I based off a similar script from /usr/lib/initcpio/install/encrypt)
/etc/initcpio/install/dm-cache
#!/bin/bash

build() {
    local mod

    map add_module 'dm-mod' 'dm-cache' 'dm-cache-smq' # Kernel modules

    map add_udev_rule \
        '10-dm.rules' \
        '13-dm-disk.rules' \
        '95-dm-notify.rules' # Udev rules for device mapper

    add_binary '/usr/bin/dmsetup' # Commands we use
    add_binary '/usr/bin/blockdev'

    add_runscript # And the hook itself
}

help() {
    cat <<HELPEOF
This hook allows for a cached root device using dm-cache.
HELPEOF
}
# vim: set ft=sh ts=4 sw=4 et:
After getting the install script and hook, I edited /etc/mkinitcpio.conf to include dm-cache somewhere in the HOOKS array before filesystems :
...
HOOKS=(... modconf ... dm-cache ... block ...)
...
And, I also edited /etc/default/grub, so that the bootloader would use the Device Mapper device name instead of the UUID (as per the Caveats above).
GRUB_DISABLE_LINUX_UUID=trueGenerating initramfs and bootloader configuration
At this point, we want need the device mapper fully set up to regenerate grub correctly, so I rebooted back into the installation medium to finish up the last few bits. (You could potentially avoid needing an installation medium by manually editing Linux kernel parameters, but it is risky, and you would need one anyway, per caveats.)
Once on the installation medium, I mounted the about-to-be-cached root partition, then copied the /etc/initcpio/hooks/dm-cache file out of it.
Next, I unmounted the partition, since we want to enable cache before using it. And then I ran the copied hook to set the mapped device up (with . dm-cache; run_hook).
Then, I mounted the cached root partition, /dev/mapper/root-cached, and did an arch-chroot into it.
Then, following the usual installation process again, I regenerated the initramfs with mkinitcpio -P and the bootloader configuration with grub-mkconfig -o /boot/grub/grub.cfg.
(At that point, I ran less /boot/grub/grub.cfg and confirmed that the root= part of the Linux command line correctly points to /dev/mapper/root-cached)
And with all of that in place, I... 🥁 drumroll rebooted.
...Aaaand it didn't boot. (Though the mistake has been corrected, and it should work for you)
To fix it, since I didn't have any backup initramfs, I had to remove the quiet flag from the Linux command line (either through /etc/default/grub or by using Grub's edit option while starting up), observe the error of a missing kernel module, and then boot up the installation medium to fix it in the installation script.
And then I had to do it again for the dm-cache-smq kernel module, since cache policies (including "default") are packaged into separate kernel modules.
(To return back to the previous state, I would have instead had to mount the raw, uncached partition, revert the change to /etc/mkinitcpio.conf, then regenerate initramfs and grub config as before.)
But with all of that sorted, I could finally boot into my real system again, and finally observe that lsblk produces the following tree of devices:
NAME            MAJ:MIN RM   SIZE RO TYPE MOUNTPOINTS
sda               8:0    0 931.5G  0 disk
├─sda1            8:1    0    32G  0 part [SWAP]
└─sda2            8:2    0 899.5G  0 part
  └─root-cached 254:0    0 899.5G  0 dm   /
sdb               8:16   0 232.9G  0 disk
├─sdb1            8:17   0   512M  0 part /boot
├─sdb2            8:18   0   953M  0 part
│ └─root-cached 254:0    0 899.5G  0 dm   /
└─sdb3            8:19   0 231.5G  0 part
  └─root-cached 254:0    0 899.5G  0 dm   /
Beautiful.
And of course, everything still works.
Success! 🎉
(Time spent configuring things for real: ~2.5 hours, mainly fighting dependencies in the installation script)
Step 5: actually switching dm-cache on
The final step of the process is to change dm-cache to a non-passthrough mode, since passthrough is a dummy mode in which the cache just passes reads and writes to the origin.
As described in the Linux documentation, we have a choice of two modes for the cache that do any caching:
writeback(the default). New writes go to cache, and are asynchronously mirrored on the origin device. Reads are served from cache first, then from origin if not found in cache. This is riskier, as it can result in the origin device and the mapped device to differ—and thus, mounting the real device will result in the wrong data being read if the cache still has writes not yet written back to the origin.writethrough. New writes go to cache and to the origin, synchronously. Reads are served from cache first, then from origin if not found in cache. This results in slower writes, as we have to wait for them to happen on the slow origin device before we can complete them.
Knowing that some of the applications I use like to do a lot of writes (particularly Firefox, as discussed in the problem statement above), I opted to go for the writeback mode, and accept the potential risk in return for faster operations.
To apply the change, we have to go back to the /etc/initcpio/hooks/dm-cache script, and change the OPTS line from earlier:
...
# For writeback:
    OPTS="256 0 default 0"
# For writethrough:
    OPTS="256 1 writethrough default 0"
...
Afterwards, I rebooted, and was greeted by system that was now caching reads and writes on the SSD before hitting the slow HDD!
Applications still took a bit to start the first time around, but after that first load, there was no question that the system was working much better than ever before. Firefox was back to starting up in under a minute (despite process kills and crashes), and Docker's df command could actually complete in reasonable time.
Great success! 🎉🎉
(Time spent at this step: ~10 minutes)
Step 6: (optional) checking cache statistics
To figure out how much data has been served from cache, we could use the dmsetup status root-cached command.
Unfortunately, it is much too hard to read.
Fortunately, Forza has shared their cachestats.sh script, which prints all that info in a nice, tabular form.
Here is how it looks for me, after about 3 weeks of active usage, including plenty of Docker and some new software installations (numbers rounded for a bit of privacy):
DEVICE
========
Device-mapper name:       /dev/mapper/root-cached
Origin size:              1 TiB

CACHE
========
Size / Usage:             231 GiB / 95 GiB (41 %)
Read Hit Rate:            3850000 / 4670000 (82 %)
Write Hit Rate:           58180000 / 59500000 (97 %)
Dirty:                    2 MiB
Specifically, take a look at the Cache Read Hit and Cache Write Hit lines. Despite the used cache space being only about a tenth of the size of the origin device (and the filesystem is about 50% full; so, it's around a fifth of the total size of all files), a bit over 80% of all reads have been served from Cache, and almost all writes go to cache directly.
(Time spent gathering stats: ~30 minutes)

Remarks and lessons learned
As of now, the state of using dm-cache without LVM in Arch Linux is a bit underwhelming. While the Device Mapper subsystem works surprisingly well (compared to e.g. FUSE) and successfully interoperates with all the rest of the Linux kernel (and userspace), the lack of readily-available documentation or hooks for mkinitcpio means that setting up a dm-cache device is rather involved.
I think that the most likely reason for this is that LVM is much easier to set up for both administrators and distribution developers, and is generally the most standardized way of setting device mapper up. Unfortunately for me and other people who didn't pick LVM when installing their system, however, converting an existing installation to LVM is very hacky and involves raw disk editing... and the convoluted process of setting dm-cache up still felt safer than attempting that.
In the end, having any kind of SSD cache for an HDD is really really worth it! Even though Linux automatically caches files and folders in RAM, the extra cache still speeds up all IO operations, especially after booting up. And the performance difference can be felt! And the fact that dm-cache lets me get that kind of speed-up for "free", with nearly no drawbacks (other than taking up a bit of SSD space), cannot be understated.
Overall, I would say that taking the challenge to set up dm-cache on my machine was quite worth it.
- I learned a ton about the Device Mapper module of the Linux kernel.
- I finally understood how the initramfs/initrd filesystems tie into the boot process.
- I felt like a complete wizard while writing
mkinitcpiohooks, chanting incomprehensible incantations and watching the machine whirr to life. - I got some speedy solid-state technology to ail my aging rust, speeding up 80% of reads and 97% of writes.
- And best of all, I had fun.
Yup.
It was fun.
Let's hope I never have to do this again. 😂
...Or, well, at least I'll have this blog post when I do ✨
Browse more articles?
← Transferring photos over ADB Articles tagged technology (4/17) CSS slideshows with scroll snapping →
← Transferring photos over ADB Articles on this blog (6/52) CSS slideshows with scroll snapping →
Comments?
Hope you liked this glimpse into my recent adventures with Linux. If you found it useful or even just entertaining, I would love to hear from you!